How to Use the Ankarsrum Mixer

(Long page, please scroll down.)

Click links to jump down this long page:
Intro
Bowls & Lid
Positioning the Arm
Basic Operation
General Bread Tips
Hand Spatula
Cleaning
Troubleshooting
Recipes
Warranty
Printable Manual
Conclusion
This comprehensive guide from Pleasant Hill Grain explains how to set up, operate, and get the best results from the Ankarsrum Original stand mixer (AKM 6230 model), a powerful, durable Swedish appliance renowned for bread dough kneading, batters, whipping, and more. This page serves as a practical, detailed user manual to help new owners master this versatile, heavy-duty mixer—especially praised for superior bread results compared to conventional stand mixers.
GETTING TO KNOW YOUR ANKARSRUM

You may have heard that the Ankarsrum mixer is an outstanding mixer but that it has a learning curve. The Ankarsrum Original stand mixer does have a noticeable, but very manageable learning curve compared to more familiar planetary-style mixers like the KitchenAid, and it’s one that can be made brief by following the tips in this new guide. The Ankarsrum's unique design, with its rotating bowl and stationary roller/scraper (or optional dough hook) that mimics gentle hand kneading feels very different from the spinning attachments most bakers know. This leads to different visual cues during mixing.
What Might Be Tricky at First?
Dough appearance in the Ankarsrum can be deceptive to the new user, often looking shaggy, sticky, or "porridge-like"
for much longer (10–20+ minutes of mixing) before it suddenly comes together and develops strong gluten.
Don't expect it to "clean the bowl" or look smooth early-on like in a planetary mixer. Mixing may take
a little longer but the Ankarsrum mixes more gently.
Liquids are added first before flour is gradually added (which is the opposite of most recipes written for KitchenAid-style mixers).
Adjusting the roller/scraper is a new concept with the Ankarsrum mixer, but it takes just a little practice
to get it down pat (learn how in the "Positioning the Arm" section, below). Adjusting the arm correctly prevents issues
like dough climbing the bowl, thumping, or uneven mixing.
Common beginner's issues include overloading whisks, starting too fast (causing splatter), or not adjusting the arm properly, which frustrates some new users—especially those transitioning from planetary mixers, like the KitchenAid.

How Steep Is It Really?
User experiences vary: Many describe it as mild, saying "just watch a couple videos" or it's "no big deal" after 1–3 batches, especially if you're new to stand mixers or come from hand-kneading. Others call it moderate to steep initially (a few weeks), like learning a manual transmission car—awkward at first, but soon it’s easy and fun. Experienced bakers frequently say the curve flattens quickly with practice, and they never go back, praising how it handles large/high-hydration doughs better longterm. Ankarsrum mixers have a large, dedicated and fast-growing user community for great reasons!
Tips to Flatten the Curve
- The mixer performs best and feels most intuitive with large batches. Start with at least 800 grams of flour.
- Follow this Pleasant Hill Grain guide or similar resources for troubleshooting. Be patient with yourself! Most who stick with it (even if they had initial doubts) report that it becomes second nature and superior for bread.
- Watch official tutorials (Ankarsrum's YouTube channel has excellent intro videos with step-by-step demos).
The short-to-moderate learning investment pays off hugely in dough quality, capacity, and durability. Many call it "worth it" after the first few successful loaves!

The Ankarsrum AKM 6230 model includes two bowls: a 7.4 quart stainless bowl and a clear, BPA-free beater bowl with a usable capacity of 4.5 quarts. It also includes a bowl lid (also called a dust cover) that fits both bowls. A new stainless beater bowl is also now available (shown in the photo below). The stainless beater bowl is sold separately.
Capacity note about beater bowls: The manufacturer states a capacity of 4 qt. (3.7L) for the
plastic and stainless beater bowls, but the volume as measured to the rim of the bowl, which is the common
industry standard of measure, is actually 6 qts (5.6L); we've found that practical usable capacity is
4.5 qts. In terms of ingredient measurements the beater bowls can handle 2-20 egg whites, or 3-27 ounces
of cream.
The included lid can be placed on the large stainless steel mixing bowl when proofing bread dough. It also fits the double beater bowl and can be used during mixing to prevent splatters.

Double Beater Bowls
The beater bowls create beautiful meringues and excel at mixing light, pourable batters. They are especially well suited for soft cookie doughs such as chocolate chip, spritz, and Danish shortbread, as well as cheese straws, cake batters, pancakes, brownies, biscuits, scones, Dutch babies, popovers, pie dough, and pasta dough. (When making pasta dough, use any whisk setup on low speed and mix only until the ingredients are just combined—overmixing can cause the whisks to break.)
Thanks to the Ankarsrum’s slow, gentle mixing action compared to other stand mixers, pastry doughs and quick breads turn out soft and tender. While these doughs are easy to overmix in many mixers, the Ankarsrum makes it much easier to achieve excellent results.
The beater bowl remains stationary while the whisks are driven from below through a center column (the bowl is shaped somewhat like a Bundt pan, as shown in the images to the right). This design provides completely open access to the top of the bowl, with no overhead motor to get in the way.
The clear beater bowl that comes standard with the mixer is made from durable Tritan™ copolyester. This bowl can safely handle even boiling liquids without warping. When using any bowl, the only metal that comes into contact with your food is food-grade stainless steel.
Note: Just like the stainless beater bowl, the clear plastic beater bowl is heat resistant and safe
for pouring in boiling water.
Assembling the Beater Bowl & Bowl Tools

Insert the drive shaft into the motor base by aligning the notches on the shaft with the small bar in the motor base socket. Place the beater bowl over the drive shaft and turn it until it drops into place, with the spout facing the mixer arm.
To attach the whisks to the whisk drive, position the gear in the whisk drive housing, then slide the whisks onto the prongs, ensuring the teeth on the whisks align with the gear teeth. Press gently until the whisks snap into place. To remove the whisks, place the whisk drive on a hard surface with the whisks pointing upward and gently pull until they pop off.
Using the Double Beater Whisks & Cake Beater Whisks

Double Beater Whisks in Whisk Drive and single wire Cake Beater Whisks
Important! Ankarsrum advises that the whisks are designed for use with pourable batters and light dough mixtures only. Using the whisks for heavier loads, or operating the mixer at a speed too high for the mixture, can cause breakage of the whisks and/or the gear ring in the whisk drive assembly. Breakage caused by overload conditions isn't caused by manufacturing defect, and is not covered by warranty.

Double Beater Whisks (for Airy Mixtures)
The more wires on the whips the more air will be incorporated into your mixture. With that in mind the double beater whisks (previously called balloon whisks) are ideal for whipping cream, meringue, light icings or glazes, and egg whites—recipes that require incorporating air into the mixture.
Note: Ankarsrum states that marshmallows can be mixed in the double beater bowl, but some users encounter difficulties with this, including stripping their whisk gears. This usually happens if the batch is too large, or if the whisks are removed to check the consistency and then restarted at too high a speed. Rather than using the double beater bowl for marshmallows, we strongly recommend using the main stainless bowl with roller and scraper. See more about marshmallows farther down this page.
Cake Beater Whisks (for Soft Cookie Batters)
The single-wire cake beater whisks should be used for soft batters such as cakes, cookies, pancakes, muffins, and brownies. Soft cookie doughs include recipes like basic chocolate chip, spritz, and Danish shortbread. Thicker cookie doughs often include ingredients like rolled oats, nuts, seeds, chocolate chunks, or fruit. These thicker batters should be mixed in the stainless steel bowl using the roller and scraper (pictured below).
Butter, margarine, and cream cheese should always be room temperature (65–70°F / 18–21°C) before using the beater bowl and wire whisks, unless the recipe requires cold butter, such as for biscuits, scones or pie dough. When cold butter is required always shave or grate it before mixing it into the dough. Never incorporate chunks of cold butter as it will cause the beaters to break.
Basics directions for soft cookie dough
Place room temperature (65–70°F / 18–21°C) butter or margarine and sugar
in the beater bowl. Attach the cake beater whisks to the whisk drive and place the whisk drive on the
drive shaft. Start machine on low and slowly increase to medium/high. Once butter and sugar are creamed,
set mixer to low speed and add remaining ingredients. Mix just long enough to incorporate dry ingredients,
then turn mixer off. Over-mixing can cause cookie dough to become stiff; the stiffer the dough is, the
greater the risk of breaking the whisks and whisk drive gear.

To use the whisks, begin mixing at the slowest speed and increase gradually. Avoid over-mixing cookie
dough once the flour has been added. When used as directed, your Ankarsrum whisks and whisk drive will
provide many years of reliable performance.
7.4 Qt. Stainless Bowl
The stainless bowl with roller and scraper (also called a dough knife) is ideal for making all kinds of bread dough, pizza dough, thick cookie batter, mashed potatoes, and even mixing ground meat for meatballs. The stainless bowl with roller and scraper is also used for creaming butter, margarine, or shortening with sugar to achieve an exceptionally smooth, creamy texture—perfect for cookies and other baked goods.
Using the stainless bowl, the mixer kneads smooth, silky, elastic bread dough quickly and easily with its unique roller and scraper design. This method effectively mimics kneading by hand, without the time and effort. Thanks to this gentle approach, the Ankarsrum is exceptional for kneading rye bread, since rye has a very weak gluten structure and can become extremely sticky if mixed too aggressively.
Some Ankarsrum owners choose to use the stainless steel bowl exclusively, preferring it over the beater bowl and whisks for all tasks. It’s worth experimenting to discover what works best for you.
Assembling the Stainless Bowl, Roller & Scraper

Place the stainless bowl on the motor base and turn until the bowl drops down onto the drive socket. Place the scraper into the smaller hole located near the tension knob (1).
To attach the roller, loosen the tension knob, allowing the arm (2) to swing over the top of the bowl, pull up on the pin (3), position the roller under the arm and push the pin down into the center of the roller. Gently allow the arm/roller to return to the side of the bowl. When kneading dough, lock the arm and roller away from the rim of the bowl by pulling the arm towards the middle of the bowl and tighten in place using the tension knob.
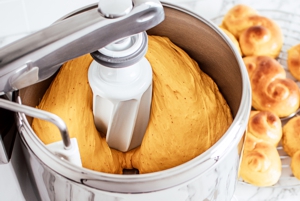
Using the Roller & Scraper
The roller and scraper are best used for smaller batches of bread, enriched doughs, and gluten-free baking. (Use of the dough hook, for larger batches, is covered further down this page.)
The stainless bowl revolves as the mixer runs, and as it turns, the deeply fluted roller acts as your fingers, with the scraper mimicking the palm of your hand. The scraper folds the dough with a rhythmic motion while the roller provides a powerful massaging action. From very large batches to very small, your dough comes out wonderfully smooth and elastic. The biggest difference between dense, heavy baked goods and delightfully textured products is proper development of the gluten in the dough, and the powerful AKM 6230 mixer is a master of kneading technique.

Roller and Scraper
Bread Dough
Use the roller and scraper for high hydration yeast doughs. Start the machine on the lowest speed with the roller resting against the rim of the bowl. Begin with liquid ingredients and slowly add flour and other dry ingredients; this helps the ingredients to mix without dry spots, and it's easier to incrementally add dry to wet than the other way around.
As the dough thickens, adjust the roller away from the side of the bowl and lock in place using the tension knob. The ideal distance to set the roller from the rim of the bowl depends on the amount of dough you’re mixing. You’ll want the roller to apply gentle pressure to the dough as it passes between the roller and the side of the bowl, but don’t position the roller so close that it pushes the dough up and out of the bowl.
If the amount of dough in the bowl begins moving the arm/roller back and forth with much force, reduce the speed and adjust the arm/roller a little farther from the side of the bowl. Follow specific recipes for the kneading speed and time. When locking the arm/roller in place the arm is still able to move toward the center of the bowl, but it’s locked from moving towards the side of the bowl.
Creaming Butter or Margarine

Place room temperature (65–70°F / 18–21°C) butter or margarine and sugar in the bowl. The roller should be resting against the rim of the bowl. Start machine on low and slowly increase speed to high/medium. If the ingredients collect in the center of the bowl, gently swing the arm/roller into the center a couple of times to ensure thorough mixing. Run for about five minutes for best results. Butter or margarine will stick to the roller at first but will work itself off and cream beautifully.
Cookies
Follow directions above for creaming butter with sugar. Once creamed, reduce speed to low and add remaining cookie ingredients. Again, if ingredients collect in the center of the bowl, gently swing the arm/roller back and forth to ensure proper mixing. If mixing a large batch of cookies, adjust arm/roller slightly away from the rim of the bowl and lock in place by tightening the tension knob.
Cakes
With roller resting against the rim of the bowl, combine ingredients and mix on medium/high speed for about five minutes or until mixture is well mixed. Remember to gently swing the arm/roller into the center of the bowl as needed, to ensure all ingredients are incorporated.
Whipping cream (2 to 4-1/2 cups)
Pour whipping cream into stainless bowl. With the roller resting against the rim of the bowl, turn machine on at the lowest speed. Slowly increase speed to medium/high and whip until desired thickness is reached. For best results, chill the bowl in the refrigerator or freezer before adding the cream.
Meringue (2 to 20 egg whites)

Combine egg whites and sugar in the stainless bowl. With the roller resting against the rim of the bowl, turn machine on to the lowest speed. Slowly increase speed to medium/high and whip until the desired stiffness is reached. For best results, the egg whites and bowl should be at room temperature.
Mashed Potatoes (1 to 5 lbs.)
Place cooked potatoes in the stainless bowl with the roller resting against the rim of the bowl. Turn machine on at the lowest speed. Add remaining ingredients and gently press the top of the arm/roller to force potatoes to mash. Over-mixing will cause potatoes to become gummy.
Mincemeat, Sausage Meat, Pâté (1 to 6-1/2 lbs.)
Mix ground meat at medium speed. If you’re mixing large quantities, adjust and lock the arm/roller about two inches from the side of the bowl.
Marshmallows

While marshmallows can be prepared using the double beater bowl with the balloon whisks, we strongly recommend using the stainless steel bowl with the roller and scraper attachment instead. Marshmallow mixtures can be very demanding on equipment, and taking appropriate precautions helps ensure longevity and reliable performance.
The double balloon whisks are specifically designed for lighter, airier mixtures such as whipped cream, egg whites, and cake batters. In contrast, marshmallow batter consists of a thick, sticky sugar syrup and gelatin mixture that rapidly increases in viscosity and stickiness as it cools, becoming extremely dense. This can place excessive strain on the plastic gear teeth within the whisk assembly, potentially leading to stripping or damage.
To prevent damage to the whisks or internal gears, we advise using the roller and scraper with the main stainless steel bowl. This configuration is engineered for heavy, high-resistance mixtures. It distributes the load more evenly across robust components, avoiding the concentrated stress that can occur with the whisk assembly.
Click here for a recipe and instructions for making marshmallows in the Ankarsrum mixer. These guidelines will help protect your equipment while producing excellent marshmallows.

Attaching the Dough Hook
When setting up your mixer for the first time, check the larger hole (1) located beside the tension
knob for the spring that allows you to adjust the height of the dough hook. If you don’t see a spring in the hole, check the box—it may have come out during transit.
To attach, place the dough hook into the larger hole (1). Loosen the tension knob, allowing the arm (2) to swing over the top of the bowl. Pull up on the pin (3), position the dough hook under the pin and gently press the pin into the slot on the side of the dough hook. Tighten the tension knob so the dough hook is locked in at the center of the bowl.
The distance between the bottom of the bowl and the hook should be 4-5 mm. If necessary, adjust the height by adjusting the screw on the arm with a screwdriver.
Using the Dough Hook
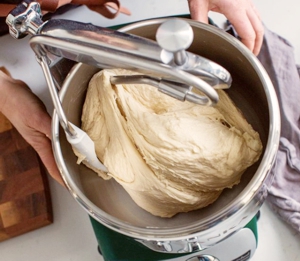
The dough hook is ideal for larger batches and multiple loaves. It kneads by pulling and stretching
the dough for efficient mixing.
The Ankarsrum Original dough hook operates quite differently from those on familiar mixers like the KitchenAid or Bosch. While other mixers have the hook spinning around a stationary bowl, the Ankarsrum's dough hook stays stationary as the bowl itself rotates, creating a gentler, more hand-like folding and stretching action.
We recommend the dough hook for both high-hydration doughs (over 70%) and low-hydration doughs (under 60%). That said, you can experiment with the roller/scraper setup too—many bakers find it performs even better for some recipes.
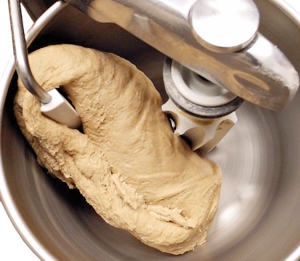
Yeast Dough
Use the dough hook and scraper together for high hydration yeast doughs like ciabatta and baguettes.
Low hydration yeast doughs like bagels, pretzels, croissants, and challah can also be kneaded with the dough hook, but the scraper is unnecessary for stiff dough. Add ingredients to the stainless bowl with the arm/hook locked about two inches from the side of the bowl, and begin mixing on low speed. Add the flour incrementally. As dough thickens adjust and lock arm/hook to center of bowl. For large batches, add just half the flour, mix well, then add remaining flour. Follow recipe for specific mixing speed and kneading time. You may also want to try low hydration dough with the roller and scraper and see what works best for your recipe.
Mincemeat (1 to 5-1/2 lbs.)
Lock the arm/hook in at the center of the bowl and mix at medium speed.
Positioning the Arm
Position the arm and roller so that the roller applies gentle pressure to the dough as it passes between the roller and the side of the bowl. At the same time, make sure it’s far enough away that it doesn’t push the dough up and out of the bowl. The dough should not move the arm or roller with significant force—some gentle movement is normal, as the arm and roller are designed to mimic hand kneading: the scraper folds the dough while the roller kneads it against the bowl’s side. Avoid setting the roller too close, as tightening the tension knob further in that case can damage its threads.
Basic Operation

1 . Insert plug into the back of the motor base, then plug into a wall socket.
2. The left knob is the On/Off/Timer knob. Turn the knob to the “On” position for continuous use, or set to the desired mixing time by setting the timer from 1 to 12 minutes. To stop the machine at any point simply turn the knob to the “Off” position.
3 . The right knob is for adjusting the bowl speed. For suitable speed settings, refer to specific recipes or attachment use recommendations. The general terminology used for speeds in this manual is that of a clock. The lowest speed is at the 12 o’clock position, the fastest is at 8 o’clock.
Ankarsrum Speed Knob Position |
| Speed | Knob Position |
| LOW | 1 o'clock |
| MEDIUM-LOW | 2 to 3 o'clock |
| MEDIUM | 3 to 4 o'clock |
| MEDIUM-HIGH | 5 to 6 o'clock |
| HIGH | 7 to 8 o'clock |
|
Quick Tip: For most bread dough, you'll want to knead between the 2 and 3 o'clock positions. If your dough is particularly stiff, knead at a lower speed (around 2 o'clock). |
|
General Bread Tips
Sourdough recipes work just as well in the Ankarsrum mixer as breads made with commercial yeast. Mixing techniques are determined by dough hydration rather than the type of yeast used. Below are a few tips for making bread, whether it's made with wild or commercial yeast.
Autolyse

Many bread bakers begin by mixing only the water and flour on low speed for 3–5 minutes, then allow the mixture to rest for 20–30 minutes (or up to 2 hours) before continuing with the recipe. This step, known as an autolyse, allows the flour to absorb the water and begin developing gluten naturally.
No salt is added during the autolyse, as salt can inhibit gluten development, and no yeast is included because fermentation would begin strengthening the dough—which is not the goal at this stage. After the autolyse is complete, the remaining ingredients can be added and mixed in.
Using this simple technique introduces less oxygen into the dough and minimizes mechanical mixing, resulting in improved flavor, nutrition, color, and texture in the finished bread. Autolyse can be used with virtually any bread dough recipe.

Stretch and Folds
Bread recipes often call for stretch-and-folds after the dough has been mixed, kneaded, and rested.
When dough is developed in the Ankarsrum mixer, these steps are typically unnecessary, as the mixer builds
a very strong gluten structure during kneading. That said, some bakers still choose to perform a few
stretch-and-folds simply to handle the dough and better understand how it will behave.
Hand Spatula

The included hand spatula is useful for cleaning dough off the dough hook, roller, and scraper, and using the curved side of the spatula you can easily scrape out the beater bowl or stainless mixing bowl.
Cleaning
All bowls and bowl tools are dishwasher safe, although hand washing is recommended for the clear beater bowl. Beaters should be placed in the top rack of the dishwasher and plastic beater bowl should be placed in the lower rack, but not directly over the drying element as it may melt the plastic. To wash by hand, use warm soapy water and wash with a sponge or cloth.
We recommend soaking the bowls in warm water as soon as you empty them, to make them easier to wash them out later. To clean any stubborn dough marks off the stainless bowl, a stainless steel cleaner like Bar Keeper's Friend or this Kuhn Rikon cleaner works beautifully! Do not use abrasive cleaners on the stainless bowls.
Troubleshooting
Dough Climbing to Top of Bowl
If dough is climbing up to the top of your bowl you probably have the dough roller positioned incorrectly. When you begin, don't lock the arm (and therefore the roller) immediately. Instead, allow it to rest against the bowl while the first ingredients are being mixed. Run the mixer at a low speed during this stage. As the dough becomes firmer and begins to climb the roller, pull the arm slightly toward the center and lock it so the roller sits 2–4 cm from the edge of the bowl by turning the base knob. You can then increase the speed to medium.
Dough Sticks to Side of Bowl
Your dough likely just needs more kneading time. It should eventually pull away from the sides of the bowl, but this can take 8–12 minutes, so patience is key. The bowl scraper (sometimes called a “dough knife”) is not intended to keep the bowl completely clean. Its primary purpose is to guide the dough back toward the roller or dough hook. While it does help clear the sides of the bowl, it isn’t designed to scrape the bowl spotless.
Dough Thumps Against Bowl
This usually occurs when the dough is too firm or when too much flour has been added. Reduce the speed
and adjust the base knob as needed. When making dough in the Ankarsrum, you typically need slightly less
flour than a recipe specifies, so add the flour gradually. Keep in mind that the dough will continue
to firm up after the mixer has kneaded it for a few minutes. If using the roller and scraper, try switching
to the dough hook locked into the center of the bowl to see if that works better for your recipe.
Ingredients Won't Mix
Occasionally, you may need to assist by pulling the arm slightly toward the center to incorporate any dry ingredients. Do not lock the arm until the ingredients have begun to combine and the dough starts to climb the sides of the bowl. Only at that point should the arm be locked. The dough hook should be centered and locked, while the dough roller should be locked 2–4 cm from the edge of the bowl.
Oil on Mixer Upon Arrival
Some customers notice oil on their mixer when it arrives. This is food-grade oil applied by the manufacturer in Sweden before shipping. It helps protect the mixer and its components from corrosion caused by sea-salt air during the long ocean transit to the United States. The oil can be easily removed by washing the parts and mixer base with warm, soapy water.

Round marks on bottom of stainless bowl
These are heat marks from spot welds and they're normal, not a reason for concern.
Arm Has No Resistance
Check the larger hole located beside the tension knob for the spring that allows you to adjust the height
of the dough hook. If you don’t see a spring in the hole, check the box—it may have come out during transit.
If you no longer have the box, call Ankarsrum USA's customer service to request a replacement spring.
Spring in Mixer Box
If you found a small spring in your mixer box, read the section just above (called "Arm Has No Resistance") to learn where to put it.
Butter Stays at Bottom of Beater Bowl
If your butter sticks to the bottom of the beater bowl when mixing, try adding your ingredients in a different order (try sugars first, then eggs, and then the butter). You may also want to try your recipe in the stainless bowl with the roller/scraper.

Butter Sticks to Grooves in Roller
Speed is key! Turn the speed up when creaming butter and sugar so the butter will fly off the roller.
To cream butter in the Ankarsrum, we recommend using the stainless steel bowl with the roller and scraper, making sure the butter is fully at room temperature (65–70°F / 18–21°C). Start mixing on low speed, but quickly increase to high speed and mix for a full minute, then add the sugar and continue on medium-high until the mixture is pale and fluffy, stopping to scrape the bowl as needed for a smooth, lump-free result. The key to achieving a light texture is properly softened butter and high-speed mixing in the stainless steel bowl, though some bakers prefer using the whisks for very soft mixtures.
Recipes
The Ankarsrum mixer now comes with Ankarsrum's hardcover 113-page recipe book. For more recipes, visit Ankarsrum's website here (link opens in new tab). Use the search bar in the upper right corner of their website to search for the type of recipe you're looking for. We also have a marshmallow recipe, here.
Warranty
Ankarsrum model AKM6230 comes with a 7 year manufacturer’s warranty on the motor base assembly, and a 1 year limited warranty on all attachments and accessories. Warranty does not cover commercial use, user negligence or abuse, or use with non-Ankarsrum brand attachments. The warranty is only valid when using the mixer as directed in the manual.
For warranty service, contact Ankarsrum's customer service by calling 770-516-0577 or emailing [email protected]. If your warranty issue is within 30 days of your purchase Ankarsrum USA will replace or repair the unit at their discretion, covering all shipping, handling, parts and labor. After 30 days, you’ll be responsible for shipping and handling to their facility in Canton, GA. Once the unit arrives they’ll inspect the machine to determine if the problem is covered by warranty. Parts, labor, shipping and handling back to you will be covered per your warranty. If the service required is due to misuse, Ankarsrum USA will contact you before repairing the machine to discuss options.
Note: We recommend that you keep the box and packaging materials your mixer came in, just in case your mixer needs to be shipped back for any reason.
Printable Manual
Click here (link opens in new tab) for a printer-friendly manual that includes the information on this page plus a whole wheat bread recipe.
Conclusion
We hope this guide encourages you! Mastering the Ankarsrum unlocks culinary dreams through consistently better bread and baked goods, making it an inspiring resource for anyone serious about elevating their home baking.

Remember that when your dough looks shaggy, sticky, or porridge-like for 10-20+ minutes, that's normal, not a failure! This guide should give you the know-how to set yourself up for success and troubleshoot issues that may arise (like dough climbing, thumping, splatter, or overloading). If you have questions not answered here or would just like to discuss your particular needs, our knowledgeable customer service representatives would love to talk with you.
The Ankarsrum's gentle, hand-mimicking design truly excels at superior gluten development, large batches
(up to 7 loaves), high-hydration/rye doughs, and quiet, stable performance—often yielding "smooth, silky,
elastic" results that outperform conventional mixers once mastered.
The Ankarsrum is a premium tool for serious bakers, and despite a short learning curve (roller adjustments, unconventional cues), it delivers superior dough texture, quiet reliability, and versatility—rewarding patience with exceptional bread results and amazing longevity. The Ankarsrum mixer is ideal for those prioritizing quality over familiarity with planetary mixers! Success, and baking joy, is achievable and reliable with the Swedish-made Ankarsrum mixer!
